The river tables in epoxy resin are magnificent and highly sought-after pieces of furniture. With good organization and some skills, they can be created by experienced cabinet makers or DIYers.
In this article, we have decided to tell you how to create and make a coffee table with a central “river” in epoxy resin that runs along with the table, but we have also cut the sides to create a waterfall effect on both feet. You can adapt the process to create small side tables, large dining tables, and other types of furniture and artwork.

Table of Contents
Before making the Epoxy Resin River Table
Choosing the right wood to make an Epoxy Resin River Table
The first step to creating your own epoxy resin river table is to choose the piece of wood you will use to make the top of your table. Any type of wood will do, but you’ll probably want to go with one that has a grain and color that you like.
The most important thing in choosing your piece of wood is to make sure the wood is dry, well seasoned, and as flat as possible. This guide assumes that your piece of wood is made up of all of these things. While you are at your lumber supplier, you can have them plane the wood to the thickness you want and leave a reasonably smooth finish on the wood. You can also have them cut the wood down the middle if you plan to cut the board in half to make your river.
Materials and Products Needed for the Epoxy River Table
The products and materials used in the project to create an epoxy resin river table are as follows:
- Transparent epoxy resin
- Wood – with a receding edge
- Translucent coloring pigments – we used blue but you can choose whichever color you like the most.
- Tape – flash/release and double-sided
- Polypropylene sheet
- Polishing paste and oil (or similar)
- Tools – miscellaneous
- abrasives
- Spreaders and Mixing Sticks
- Mixing cups and buckets
- epoxy adhesive
- Security equipment
- hot glue gun
- Digital scales
Working conditions to make the Epoxy River Table
A dry, heated workshop environment is essential for wood and epoxy for wood. During placement and throughout the curing time of the epoxy resin, it is important to maintain a stable shop temperature of at least 15°C, but ideally 20°C or more. Do not attempt this project in cold or wet conditions as this will certainly spoil the performance and appearance of the resin.
How Much Epoxy Resin for the River Table?
The very nature of a live edge on a piece of wood makes it difficult to calculate exactly how much epoxy resin you will need for the river table project.
There are practical methods that can be used to measure the exact volume of an irregularly shaped cavity – such as pouring rice or sand into the gap and then measuring the volume – but in most cases, it is more a matter of estimating the volume of the slit and leave a little more.
So here is the simplest formula to calculate the amount of epoxy resin you need to make the river table:
Length (in meters) x Width (in meters) x Depth (in millimeters)
For example: 1.5 meters (Length) x 0.15 meters (Width) x 30 millimeters (Depth) = 6.75 Liters
In simple terms, 6.75 liters of epoxy resin can be likened to 6.75 kilograms of resin.
We always suggest slightly overestimating the amount of resin you think you’ll need, as it’s likely that the wood will absorb some of the resin and it’s always better to have too much mixed in than not enough – especially when painting. coloring of the resin, to ensure a uniform color.
The last tips before making your epoxy river table
By following these simple steps, you’ll avoid many common resin and woodworking problems. Preparation and a controlled environment will minimize problems and produce better results.
- Don’t start with cold materials:
Your workshop, wood, and containers of unmixed resin should all be at 20°C before you start (if your resin is delivered cold, it may take several hours for it to reach temperature ambient). - Maintain the temperature during the cure:
The temperature of 20°C must be maintained throughout the curing time of the resin (at least 48 hours). You should not leave the workshop to cool down overnight. - Work in a dust-free environment:
Your work environment should be clean, clear and level and as dust-free as possible. - Test your barriers and prepare for tightening in advance:
Test your resin barriers with water to make sure they don’t leak. Think about how you will attach the boards before pouring the resin and test the process. - Measure Accurately and Mix Carefully:
When measuring resin and hardener, be sure to understand the difference between parts by weight and parts by volume. Use the correct mixing ratio for the chosen measuring method. Measure as accurately as possible and never add, for example, an additional hardener. Mix the resin well and always use the “double potting” method. - Pouring the resin in two steps:
The wood breathes, which can cause air bubbles in the resin. Use a first shallow coat of epoxy resin to seal the wood (including the underside) before pouring the main quantity.
How to make an Epoxy Resin River Table?
Step 1: Preparing the wood for the river table

You then need to flip and reverse your wood pieces to create the river channel and remove the bark from the live edge. This will allow the epoxy resin to bond to the solid wood and the finished table will be mechanically strong.
Use a wood chisel to remove the bark, then scrub with sandpaper to remove any loose material, then wipe or vacuum dirt and dust from the wood.
Step 2: Seal the wood and fill the knots
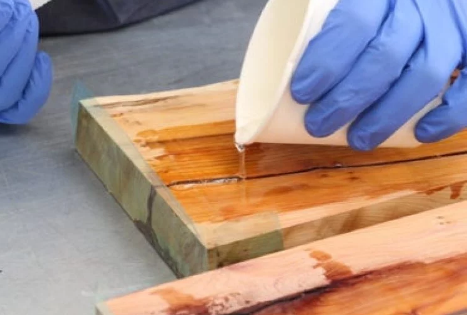
- Then you need to check if there are any cracks, knotholes, and voids on the top and bottom of the wood pieces and fill them with resin to seal them
- Use masking tape to seal cracks and gaps to prevent the resin from leaking out – release tape is very effective for this purpose.
- Measure and mix a small amount of epoxy resin and pour it into the gaps. Check after a few hours to see if it needs to be topped up, as the wood will likely absorb some of the resin.
- Lightly fill the gaps with epoxy resin, then let it harden completely according to the instructions.
- When the resin is fully cured, use abrasives to level the surface, removing any high spots with a sander or sandpaper – you’re aiming to leave a grooved surface, so a coarse abrasive is ideal.
Tip: When you have thoroughly mixed the epoxy resin and hardener, pour the mixture into a second cup and mix again to make sure there is no unmixed resin left over – this is called “double potting”.
Step 3: Create a container

Now position your wood slabs and take into account the river channel so you can make a container around the whole table slab – this will support the epoxy resin while the river is pouring and curing:
- Start with a flat sheet – something like MDF or chipboard that’s just a little larger than the slab you’re going to produce and will make a baseboard to work on.
- Then, with a suitable product (we used a sheet of polypropylene because the resin does not adhere to it), we cut out a base and side rails to create a container around the wood. The base should be approximately 8cm larger than the size of the table to allow for the installation of side rails and slats (if required).
- Using a hot glue gun, run a bead of glue all the way around the base and side rail seams to make sure the container is watertight.
- Test the seal, but be sure to dry the container thoroughly.
- It’s good to use clamps or weights to make sure the boards don’t float around in the resin – a test that too, to make sure they stay in place and as flat as possible. When you are happy, remove all the clamps, supports, and wood for the table and you are ready to prepare your resin.
- You may need a few sticks to place against the wood and clamps – we covered ours with flash/release tape so they won’t stick to the epoxy resin.
Step 4: Add color and pour epoxy resin
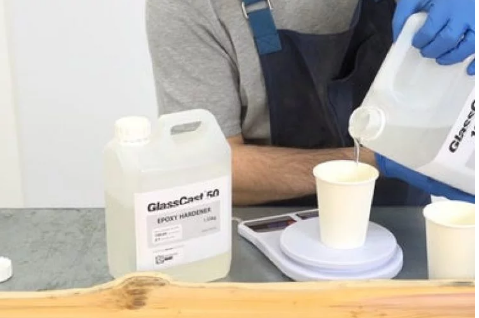
Your personal taste will dictate whether you choose to tint or color your epoxy resin or leave it clear. Many manufacturers use luminous powders, metallic pigments, solid colors, and embed objects in their rivers of epoxy resin. We recommend that you experiment extensively with a small amount of epoxy resin with the effect you want to achieve before trying out your table.
We used translucent blue pigment in our resin to achieve the watery effect in our table.
The resin we used is the new Resin Pro resin which can be poured to a depth of 25mm in one go.
For this project, we split the main river in two – and before that, we poured a base and waterproofing layer.
Measurement and coloring
- Following the instructions, measure or weigh the epoxy resin – enough to keep the whole project consistent. You can calculate the amount of resin needed for your project using the formula given above.
- Add the color pigment to the epoxy resin – a little goes a long way, so add a few drops at a time and mix well.
- Limit each mix to 5 kg and repeat if necessary
- Then add the correct amount of hardener to the pre-colored resin and mix well
- Then transfer to a second clean bucket and mix again (double potting)
You are now ready to prepare the resin for the base/sealer coat.
Step 5: Pour base coat and let reach step B

We advise pouring a base coat to seal the underside of the wood – this will help minimize air bubbles during the main pour.
- Make sure the epoxy resin completely covers the base surface
- Put the wooden planks back in the correct position on the epoxy resin
- Using a paintbrush, seal the edge and top surface with resin, including filling any knots, cracks or splits.
- Place pre-covered wooden blocks on the barriers and poles and secure them in position
- Let the epoxy resin reach stage B of the polymerization
Stage B Epoxy Resin
- Stage B means that the epoxy resin has started to get firm but still has some tackiness
- To know if this stage has been reached – with a gloved finger touch the resin and if it leaves a mark but does not stick to the glove, it has reached stage B and you need to prepare part 1 of the pour
- If you allow the resin to harden past Stage B, it will not chemically bond to the next layer and will therefore need to be buffed over its entire surface with sandpaper to bond to the new layer.
Step 6: Pour layer 1 of the river
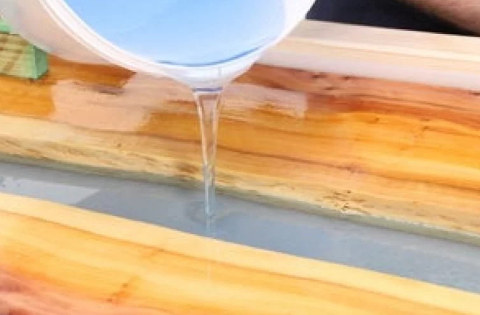
Once stage B has been reached on the base/sealing layer, you need to prepare the epoxy resin for layer 1:
- Measure the pre-pigmented resin and dose and mix the correct amount of hardener
- Transfer to a second saucepan and mix again
- Pour the epoxy resin into the river channel of the table
- Use a heat gun to remove bubbles – the Resin Pro will degas on its own, but you can speed up the process by using a heat gun or hairdryer on a medium heat that the resin retains.
- Then let layer 1 cure to stage B
Step 7: Pour layer 2 of the river

Repeat the steps for the second main pour once stage B has been reached on the first part:
Measure – Mix – Pour – Heat Gun
If necessary, repeat the process until the table river is full – remember to double mixes and if pouring multiple layers, wait until stage B before mixing and pouring the next layer.
Try to lightly fill the river channel, then let the epoxy cure completely!
Step 8: Routing and Sanding the River Table

To complete the river table in the project, we used a router set up on the slab of a bridge since we didn’t have access to a drum sander or a mulcher and we rolled the surface over the entire surface making multiple passes.
This allowed us to achieve an even, even surface of equal thickness across the entire surface and we were then able to sand the surface using a hand sander from coarse to smooth grit to achieve a beautiful finish on wood and resin.
We worked our way through 120, 240, 400, 800, and 1200 grit and made sure all the scratches from the previous grit were removed at each stage before moving on to the next. If this is not done correctly there will be small visible scratches in the final polish and the sanding process will need to be repeated.
You can of course skip this step altogether if the look you want to achieve is a full gloss, which can be achieved by pouring a floor coating epoxy like Dipoxy 2K-700 onto the keyed surface.
Step 9: Making and fixing the sides/legs of the river table

Next, we created the sides – you could attach ready-made legs like bobby pins, but we wanted to create a waterfall effect on the sides to add more interest to the river table.
This was done by:
- Measurement of the slab and marking of the 2 sides/legs
- Strafing the slab using a 45° angle on the saw and joining the 2 angles into a 90° angle
- Repeat the process for the other side/leg
- Then we glued the joints using a transparent epoxy adhesive
- To do this, we masked the areas immediately around the joint with masking tape to limit any spillage and create a hinge that allowed both sides to be properly guided.
- Then we applied the glue to the outside of the joint so that when pressed it filled the joint evenly and completely
- Then we propped and clamped the sides in place to support the angle while it cured and left it until it was fully cured then removed the tape
Step 10: Polishing the river table
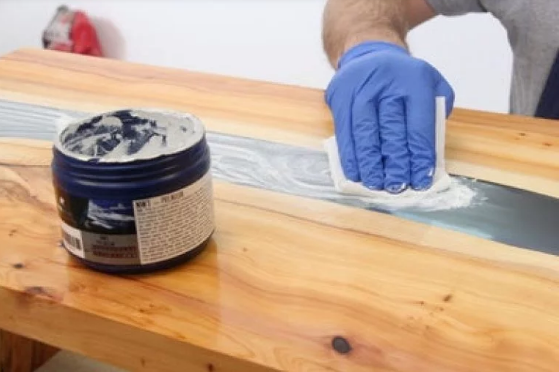
To finish the epoxy resin river table you will need to seal the wood – you can choose the look you want to achieve – we used a clear danish oil and rubbed it with a lint-free cloth then left it to soak and dry.
It is important to do this before polishing the river of resin because the polish can mark the wood if it is not protected.
To polish the resin you will need a handheld polisher and a high-quality polishing compound like Pai Cristal NW1. We applied the compound to the river and used the polisher to achieve a high gloss finish.
Step 11: This is how you make an epoxy resin river table!
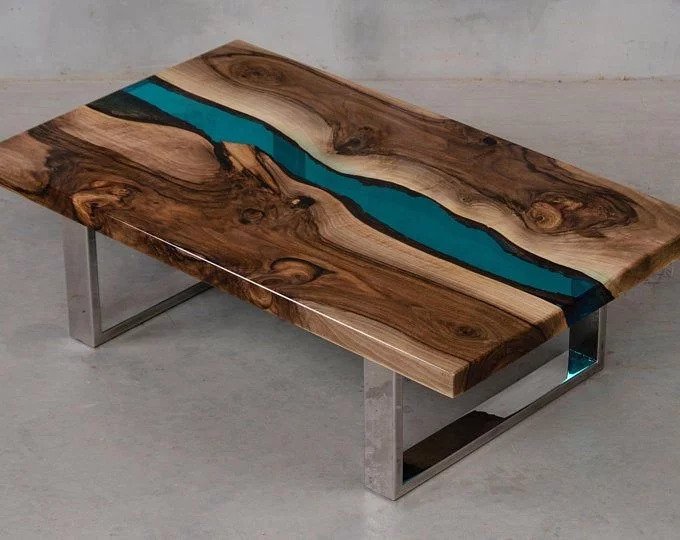
This is how we created our river table in epoxy resin!
You can see from the pictures that the river is so bright and the blue pigment so similar to water.
You can change the look of your furniture by using different products like a wax or a stain to change the look of the wood and of course you can also change the look of the river by using different colors, or by embedding objects in resin casting.
The resin also looked very nice after sanding, with an opaque appearance, so you could leave it with a matte effect or, as already mentioned, you could pour a coating resin over it to achieve a finishing gloss on resin and wood – it’s really a matter of personal taste.
You can also adapt the processes and techniques for many different projects using wood – the possibilities are endless!
